Working on a Complex Proposal? LiquidText Can Help.
December 03, 2022
If you are preparing a proposal for a U.S. government (USG) agency, center, or institute such as the National Institutes of Health (NIH) or the National Science Foundation (NSF), you probably already know that it can be a complex, confusing undertaking. And if you haven’t applied for USG funding yet but are considering it, one factor that might be influencing your decision is the difficulty of the application process.
One of the reasons why USG funding opportunities are so daunting is that you usually need to consult multiple documents located across the funding agency’s website (and sometimes, several websites) to understand how to prepare and submit your application. In contrast, applying to a private foundation is usually much easier because all the information you need to understand the opportunity and application process is typically found entirely within the opportunity posting or on a couple of pages of the foundation’s website.
We’ve submitted proposals to several U.S. government agencies, including the Department of Labor, the Department of State, the Department of Agriculture, the United States Agency for International Development, the Health Resources and Services Administration, the Eunice Kennedy Shriver National Institute of Child Health and Human Development, the National Institute of Allergy and Infectious Diseases, the National Science Foundation, and the Centers for Disease Control and Prevention. In each case, we’ve relied on a combination of tools allowed (or dictated) by our employers. These tools include spreadsheets, tables, lists, calendars, and shared workspaces on SharePoint or Microsoft Teams to collect, organize, summarize, and track all materials relevant to the application. These tools are generally effective at organizing most proposal efforts. However, they are not always sufficient when preparing a response to opportunities released by funders such as NIH and NSF, which have complex, frequently changing application procedures. For NIH and NSF, we’ve found it advantageous to gather all relevant background materials in one place, where they can be searched simultaneously and—this is crucial!—easily cross-referenced. After trying various options, we’ve found the app LiquidText to be ideally suited for this task.
WHAT IS LIQUIDTEXT?
LiquidText is sometimes referred to as a PDF reader. While this is a central function of LiquidText, it isn’t the software’s most compelling feature or the reason why it is so useful for developing proposals. There are many options for PDF readers, including several that, like LiquidText, allow you to highlight text and add notes. What makes LiquidText a standout tool is its ability to create workspaces where you can not only read the content but also interact with it in various ways, such as linking notes to sections of text within a single document and adding connective “threads” between documents.
LiquidText also supports multiple formats. In addition to PDFs, you can upload materials from webpages and Microsoft applications such as Word and PowerPoint. LiquidText also supports content management systems, including Dropbox, iCloud, and Box, and allows you to export your LiquidText projects to popular application formats. For a summary of what LiquidText offers, below is a screenshot from the company’s website that lists some of its features:

COST
LiquidText offers a 7-day free trial, but there is no free option. If you want to try it for your next proposal, you’ll have to pay at least $96/year. For us, because of the number of federal proposals we work on annually, we can justify the cost. However, if you submit proposals mostly to small foundations, it may not be worth purchasing LiquidText if you already have access to a PDF reader that allows you to highlight and annotate text.
As of December 2022, here’s LiquidText’s pricing:

HOW DOES IT WORK?
LiquidText is easier to understand when you see it in action. We’ve embedded a short YouTube video produced by LiquidText that will give you an idea of what it means to add links and connective threads within and between documents. Seeing an example of how LiquidText can be used should also make it easier to follow our description of select features that make it particularly good for proposal work.
☞ Note: This is not a sponsored post. We are recommending LiquidText solely because we use it to manage more complex proposals.
MANAGING PROPOSAL BACKGROUND MATERIALS USING LIQUIDTEXT
Before we discuss how we use LiquidText for proposal work, we want to underscore that LiquidText is a “nice to have” tool that can help with specific tasks for more complicated proposal efforts. It is unlikely to replace the resources you currently use for writing proposals. In practical terms, this means that if you incorporate LiquidText into your proposal process, it’s going to add steps to your proposal process. Even though it adds steps, the extra work can make it measurably easier to respond to certain opportunities, such as those sponsored by NSF and NIH, or others that are similarly complex.
We began using LiquidText earlier this year after realizing how useful it could be for proposals. Since incorporating it into our workflow, we’ve used it as part of our proposal management process for USG proposals submitted to three federal agencies: NSF, NIH, and the U.S. Department of Labor.
When we first decided to give it a try, we were working on an NSF proposal. Prior to using LiquidText, when preparing a proposal for submission to a federal opportunity, we would upload the solicitation and relevant agency guidelines to a Microsoft Teams folder. The folder would include a detailed compliance matrix listing all proposal requirements and the corresponding pages in the solicitation or guidelines where each requirement appears. Although this standard approach gathers all the necessary materials in one location, which is essential, we often found ourselves returning to the source content (i.e., the solicitation and guidelines) for additional context or to confirm a requirement. After discovering LiquidText, the main change we made in our proposal workflow is that, in addition to uploading all proposal-related materials to a collaborative workspace in Microsoft Teams, we also upload all the background materials to LiquidText. By uploading the proposal materials to LiquidText, we can simultaneously search the solicitation and relevant guidelines for keywords, surfacing all instances of a particular term (e.g., “attachments”) in a single view.
So far, this might sound like double the work. Why upload the proposal materials to two different places? Microsoft Teams is a collaborative workspace that lets everyone on the proposal team access the same information. Additionally, Microsoft Teams is also where the working draft of the proposal lives. In contrast, LiquidText is a tool for individuals and is not currently optimized for collaborative work—and it’s also not a document creation tool, so you can’t use it to write your proposal. LiquidText’s primary use is to help individuals engage with various types of materials, improve their reading comprehension, and connect ideas within and between documents. LiquidText will be introducing new collaborative features in 2023, so it’s possible it may become a more team-oriented tool over time.
To help you get a sense of how LiquidText works, we describe the main steps we take to establish and use a LiquidText workspace when preparing a proposal below.
Step 1: Collect
As part of the standard proposal management process, once a decision is made to apply to a particular opportunity, we begin gathering the materials needed to prepare the response. At a minimum, this includes a copy of the solicitation, the applicable guidelines, and any templates provided by the funder. If the application will be submitted through an online portal, we also save a PDF of the online application (if the funder has not provided a PDF version, we will use Adobe to convert each page of the online application to a PDF). For an NSF proposal, the guidelines would include the current version of NSF’s Proposal and Award Policies and Procedures Guide (PAPPG), instructions for submitting NSF proposals through grants.gov (NSF Grants.gov Application Guide), and any special notices that pertain either to the opportunity or the application process.
Sample Steps to Collect Everything Needed to Respond to an NSF Opportunity
Step 1: Find the Opportunity and Download the Solicitation
Step 2: Search the Solicitation for Links to the Relevant Guidelines.
Step 3: Download the Current Version of NSF’s Proposal & Award Policies & Procedures Guide
Step 4: Download the Current Version of the NSF Grants.gov Application Guide
After storing copies of the solicitation and guidelines in a collaborative workspace, we upload them to a project workspace in LiquidText. These are the primary documents we typically consult during an NSF proposal process. If the proposal is a resubmission, we would also upload a copy of the original proposal.

Creating a Workspace in LiquidText
In LiquidText, creating a workspace will feel familiar. First, you might create a folder in LiquidSpace labeled “NSF.” Inside the folder, you could either create a subfolder with the name of the NSF opportunity you are responding to, or you could skip that step and create your proposal workspace as a project in the main folder. To create the project, you need to upload a file by choosing “open file” on the left-hand menu. Once your project space is created, you can right-click it to rename it (the default name is the file name). When you click on the project to open it, on the next screen, you’ll see the document you just uploaded. You can then use the “add document” option to upload additional files to the project workspace.
The LiquidText project workspace has several parts. On the left-hand side, you’ll see (1) some frequently used features for navigating and annotating, (2) a prompt to add documents, and (3) the list of all documents that have been added to the workspace. In the middle area, you’ll see one or more active documents you are currently viewing. In the image below, the solicitation is the active document, and on the left, you can see we’ve uploaded the two NSF guidance documents mentioned earlier. On the right-hand side, there’s a scrolling “infinite” canvas area, which is where your notes and excerpts from the documents will go. At the very bottom of the screen, there are arrows on either side of the document. These arrows let you adjust the document size for easier viewing.
If you want to look at several documents at once, you can do that as well. Each document can be scrolled separately. Below, the two NSF guidance documents are shown side-by-side, making it easier to compare related instructions.
Step 2: Review
After everything has been uploaded to LiquidText, it’s time to read the solicitation and the guidance documents. Using LiquidText’s annotation functions, you can highlight important content and extract excerpts of the text. Because the guidelines for NIH and NSF are lengthy and detailed, you will probably not read them as thoroughly as you do the solicitation. Instead, you might skim the table of contents and focus on a few topics of immediate interest, such as instructions for preparing biosketches. Because LiquidText has an effective search function, as you go through the proposal process in the coming weeks, you can do a keyword search to surface guidance on individual topics as you need it.
To highlight text in LiquidText, select the text of interest. A menu will appear, allowing you to choose the highlight color. If you want to excerpt text, you go through the same process, except that instead of choosing a highlight color, you would choose “AutoExcerpt,” which will move the selected text to the canvas to the right.
Below, you can see that there’s an excerpt from the text on the right. The blue vertical line in the document indicates that the text has been excerpted.

When you excerpt text from a document or add a comment, the excerpt or note appears to the right in the infinite canvas. If you click on the comment box, you will be taken to the location where the text appears in the relevant document. Likewise, if you click on the vertical blue bar in the document, you will be taken to the linked excerpt or comment box wherever it is in the infinite canvas.
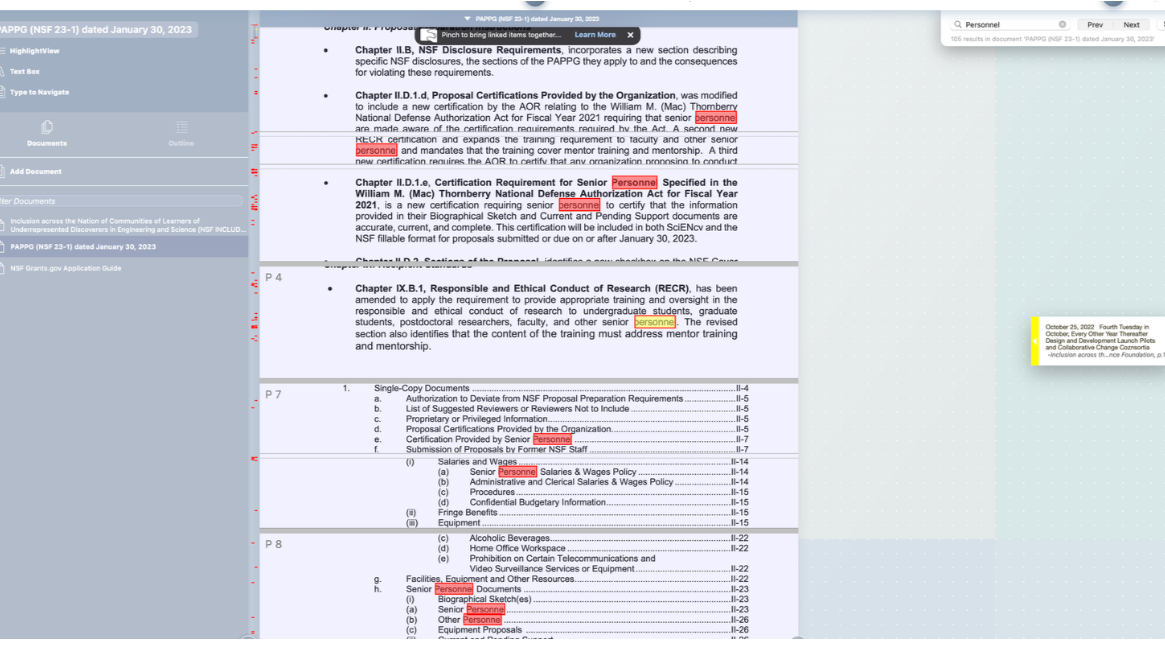
Step 3: Search for Keywords
You should now have everything set up. You have your background materials stored in your collaborative workspace, and you’ve reviewed all the key materials, adding notes and highlights. As you and your colleagues begin working on the proposal—starting with preparing the outline—you may need to confirm details from the solicitation to ensure it will be responsive. The ability to search simultaneously across all documents in a workspace and to tie all documents to a single note area makes LiquidText ideal for this task. One area where the ability to search across documents can be especially useful is when seeking guidance on personnel. Personnel-related requirements are covered in the solicitation and the guidelines. Typically, the solicitation will tell you which positions you must include in your proposed project. In contrast, the guidance documents will provide details on the supporting documentation you need to supply for each proposed staff member and where this information should go in the application.
Since we began using LiquidText for proposals, we’ve found it very handy for conducting keyword searches during proposal team meetings. Quite frequently in meetings, an issue or question arises that requires confirming a proposal requirement. LiquidText is great for these moments because you can quickly search all the proposal materials in the workspace to uncover guidance relevant to the topic. Additionally, using LiquidText’s annotation features, you can add notes during the meeting and connect those notes to one or more documents.
Step 4: Final Checks
When you reach the final stretch of the process and are getting ready to submit your proposal, you’ll want to conduct several reviews of the application before uploading it and clicking “submit.” Completing a submission checklist is always recommended during your final review. Additionally, using LiquidText, you can do selective searches across the solicitation and guidelines to confirm steps in the submission process or answer last-minute questions on how files should be assembled or labeled.
After you submit your proposal, you can upload the final copy to your LiquidText workspace. In a few weeks or months, you may need to respond to questions from the funder about your proposal, such as during the Best and Final Offer (or BAFO) phase. LiquidText’s search function can help you search your proposal, and you can use its annotation features to add notes to plan your responses to the reviewers’ comments. Additionally, if your NIH or NSF proposal is not funded, and you decide to resubmit, you’ll find it beneficial to have a copy of your original submission and relevant materials in LiquidText ready to move to a new project workspace.
CONCLUSION
We are just beginning to understand LiquidText’s features and are by no means power users. However, with the features we are familiar with, we’ve found LiquidText to be a useful addition to our proposal workflow.
When you are working on a proposal that requires referencing hundreds of pages between the solicitation, various websites, and guidance documents, it can feel very overwhelming. LiquidText is one of the best ways we’ve found to manage more complex proposals that involve complying with detailed requirements spread across multiple sources. The downside of LiquidText is that it’s an additional step and an additional expense. It’s also not perfect. For example, its search function can be buggy, and the app often closes unexpectedly. Additionally, it’s not designed as a collaborative tool, so it will not replace the workspace you are using to collaborate with your colleagues. However, the benefits of being able to tag content, create and search notes, and link content across multiple documents may outweigh the negatives, depending on the type of proposal work you do.
Other software can do similar things to LiquidText, so if you like the concept but don’t think it is a good match, you may want to explore other options. Two alternatives you may want to consider are MarginNote and Zenreader.
If you are planning to launch or advance your career as a grant writer, you may have wondered if it is worth earning a grant writing certificate.
In this post, we review three options for professional certificates, summarizing what each includes, how well-known and valued they are by employers, how much they cost, and the steps required to attain certification.